In this post, we will explain you about the Payment Batches.
Payment Batches is use to create payments for multiple invoices that meet selection criteria you specify. In addition to controlling which invoices Payables selects for payment in the batch, you can also set limits on payment amounts and decide whether to take applicable discounts.
You follow a series of steps to create your payment batch, and you initiate each step from the Payment Batch Actions window.
1) Navigate to payment Batches window Payments>Batches
2) Payment Batch Window Opens up

3) Enter the Bank Account “Arab National Bank” and choose the Relevant Document (Check/Remittance advice with no Check etc) in the Document field.. ex CHQ-2002-21
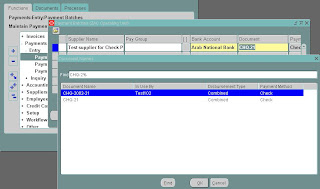

4) Message “ payment Reserving Document” will appear on the screen (system reserves the cheque number series for the batch). Click on the “OK” Button.
5) Choose the Relevant Invoice filter Criteria
- Pay through Date i.e. cutoff date to be considered for Invoice Due dates.
- Enter Payment priorities to consider Suppliers with particular Payment Priorities in Hi and Low Payment priorities fields.
- Pay through Date i.e. cutoff date to be considered for Invoice Due dates.
- Enter Payment priorities to consider Suppliers with particular Payment Priorities in Hi and Low Payment priorities fields.

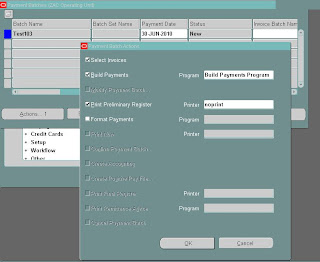
6) Click on Actions button. Observe that “Select Invoices” and “Build Payments” button already chosen. Choose “Print Preliminary Register” if you would like to check the Invoices selected for payment. Click on “OK” button.

7) Observe the Status of the Payment Batch changing to “Selecting”. Click on Requery Batch button to see the updated status.
8) Observe the Status change to Selected when the Invoice selection process is completed. Also, the next step field changes to Build.
9) Click on Requery Batch button to see the Status of the batch change to “Built” Also, “Payments” button is activated.

10) View the Preliminary register to check the details. (This step is not required if Preliminary register is printed on printer).
11) Navigate to Requests window View>Requests on tool Bar. Click on find button to see all requests submitted. Choose the Preliminary payments in Name field by clicking on it.Click on Output button to view the output.
12) Click on Payments Button to see the Suppliers / Invoices selected And to exclude / Include Suppliers / Invoices. You can view Supplier details by pressing down arrow keys.You can choose Yes/No against “Pay” field to include/Exclude a Supplier.

13) Save details once the changes are made.
14) Click on Build button to rebuild the changes made.
15) Observe the status of the batch change to “Modifying” and “Rebuilding”. Click on requery batch button to see the status change to Built.
16) Click on Actions button and choose “Format” Button to print Cheques / Remittance Advices.
This step would print cheques on the Printer. So, keep the Printer ready with cheques on it. Click on Requery Batch button to see the status change to “Formatted”.
This step would print cheques on the Printer. So, keep the Printer ready with cheques on it. Click on Requery Batch button to see the status change to “Formatted”.
17) Click on Actions Button, choose “Confirm” and “print Final Register”To confirm the Batch.
18) Choose “Printed” in status field if all cheques are printed. (Choose Spoiled if cheques have skipped half way and spoilt). Enter the last Cheque Number printed on the Printer in the “TO” field. Observe the Status change to “Confirmed”.


19) Navigate to View Requests window to see the final register and copy / Print the same.View>Requests (Tool Bar). Click on Final payment Register to choose the same. Click on view output button to see the output. Navigate to Tools> copy file to copy the file.

Really informative. Keep posting this type of information.
ReplyDeleteHi Khan, please help.
ReplyDeleteI have a payables batch from previous period that has completed but did post into GL, what must i do?